“How to set up a MIG welder with gas?” is one of the most common questions among beginners getting started with welding. While MIG welding is widely considered one of the easiest and most efficient welding methods, the setup process can feel confusing at first.
Don’t worry — in this guide, you’ll learn exactly how to set up a MIG welder with gas step by step, in the simplest way possible. Let’s get started.
Contents
What Is MIG Welding?
MIG welding (Metal Inert Gas welding) is a type of arc welding that uses a continuously fed wire electrode and a shielding gas to protect the weld area.
The heat needed for welding is generated by an electric arc formed between the welding wire and the base metal. At the same time, shielding gas (such as CO₂, Argon, or gas mixtures) protects the weld pool from contamination by air, ensuring a cleaner and stronger weld.
Different materials require different gases or gas mixes, so choosing the right one is essential.
Key Features of MIG Welding
- Fast and continuous welding process
- Produces clean, smooth welds with minimal spatter
- Requires less post-weld cleaning
- Energy-efficient compared to some other welding methods
Pros and Cons of MIG Welding
Advantages
- Easier to learn than many other welding techniques
- Suitable for a wide range of materials and thicknesses
- Can be used in multiple welding positions
- Produces less smoke and fewer harmful fumes than some methods
- High welding speed reduces distortion
Disadvantages
- Equipment is more expensive than basic arc welding setups
- Not ideal for outdoor use (wind can blow away shielding gas)
- Produces significant heat radiation
- Requires gas supply and proper setup
How to Set Up a MIG Welder with Gas
1. Preparation
Before you begin, make sure you have everything ready:
- Base metal (know the type and thickness)
- Clean and properly prepared joints
- Suitable welding wire (filler material)
- Correct shielding gas (e.g. Argon, CO₂, or mix)
- Safety gear (gloves, helmet, protective clothing)
Clean materials are essential — dirt, rust, or oil can ruin your weld quality.
2. Step-by-Step Setup
Step 1: Choose a Safe Working Area
Place your welder in a clean, dry, and well-ventilated area. Avoid dust, moisture, and direct sunlight. Make sure all cables are in good condition and meet safety standards.
Step 2: Install the Welding Wire
Load the welding wire onto the spool and feed it through the wire feeder into the torch. Ensure everything is aligned correctly and tightened securely.
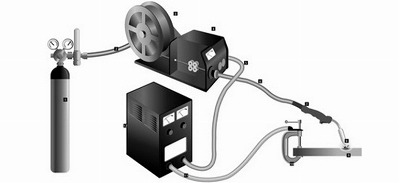
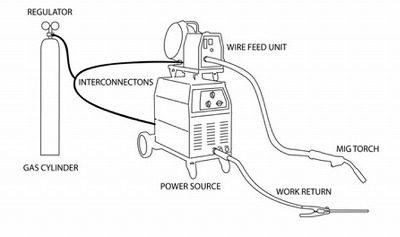
Step 3: Connect the Gas Cylinder
- Place the gas cylinder upright and secure it properly
- Attach the regulator to the cylinder
- Connect the gas hose to the welder
- Tighten all connections using a wrench
Step 4: Connect the Power Supply
Plug the welder into a suitable power source and ensure proper grounding. Attach the ground clamp securely to the workpiece.
Step 5: Connect Cables and Adjust Settings
- Secure all welding and control cables tightly
- Set the correct voltage and wire feed speed
- Adjust gas flow rate (typically 10–20 L/min depending on conditions)
These settings depend on your material type and thickness, so always check recommended values.
Final Tips for Better MIG Welding
- Always match your gas and wire to the material
- Keep your workpiece clean
- Double-check all connections before starting
- Practise on scrap metal before working on real projects
- Always wear proper protective gear
Conclusion
Setting up a MIG welder with gas might seem complicated at first, but once you understand the process, it becomes quick and straightforward.
By following the steps above and preparing your materials properly, you’ll achieve cleaner, stronger welds with less effort. Safety should always come first — never skip protective equipment or proper setup checks.


")

Leave a Reply