A well-organised welding cart can completely transform your workflow. Whether you’re working in a small UK garage or a professional workshop, proper organisation helps you:
- Save time
- Improve safety
- Work more efficiently
- Protect your equipment
If your welding cart feels cluttered or inefficient, this guide will show you the best way to organise a welding cart step-by-step.
Contents
🔧 Why Organising Your Welding Cart Matters
A poorly organised cart can cause:
- Tangled cables
- Lost tools
- Safety hazards
- Reduced productivity
👉 A tidy cart = faster and safer welding.
🧰 Step-by-Step: Best Way to Organise a Welding Cart
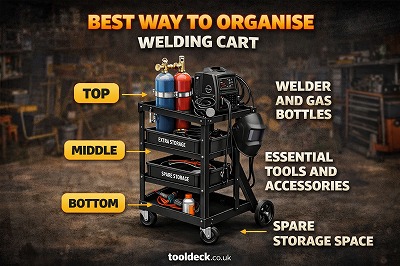
🔹 Step 1: Assign Each Shelf a Purpose
✔ Recommended Layout:
- Top Shelf → Welding machine
- Middle Shelf → Tools & consumables
- Bottom Shelf → Accessories & spare parts
👉 Keep frequently used items within easy reach.
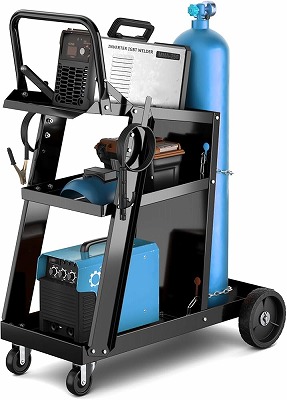
🔹 Step 2: Secure the Gas Cylinder Properly
- Place cylinder at the rear
- Use chain or strap
- Keep upright at all times
👉 Safety comes first.
🔹 Step 3: Organise Cables & Hoses
Best Practices:
- Use hooks or holders
- Coil cables neatly
- Avoid dragging cables on floor
👉 Prevents damage and hazards.
🔹 Step 4: Store Tools Efficiently
Essential Tools to Organise:
- Welding helmet
- Gloves
- Clamps
- Wire brush
- Filler rods
Tips:
- Use small bins or trays
- Group similar items together
- Keep frequently used tools accessible
👉 Organisation saves time during welding.
🔹 Step 5: Use Storage Accessories
Useful Add-ons:
- Magnetic tool holders
- Storage bins
- Tool trays
- Pegboards
👉 Small upgrades make a big difference.
🔹 Step 6: Balance the Weight
- Place heavy items at the bottom
- Keep cart balanced
- Avoid overloading one side
👉 Improves stability and safety.
🔹 Step 7: Keep It Clean
- Remove dust and debris regularly
- Wipe surfaces
- Replace worn tools
👉 Clean cart = professional workspace.
⚙️ Ideal Welding Cart Layout (Example)
TIG Welding Setup:
- Top → TIG welder
- Middle → Torch, filler rods, gloves
- Bottom → Spare parts, tools
- Rear → Argon cylinder (secured)
👉 This setup is efficient and widely used in UK workshops.
⚖️ Good vs Bad Organisation
| Feature | Well Organised | Poorly Organised |
|---|---|---|
| Tools | Easy to find | Hard to locate |
| Cables | Neat | Tangled |
| Safety | High | Risky |
| Workflow | Efficient | Slow |
👉 Organisation directly impacts performance.
❌ Common Mistakes to Avoid
❌ Overloading the cart
✔ Stick to weight limits
❌ Mixing tools randomly
✔ Group items logically
❌ Ignoring cable management
✔ Use hooks or clips
❌ Poor gas cylinder placement
✔ Always secure properly
❌ Not cleaning regularly
✔ Maintain your setup
🧠 Pro Tips for Welders
- Use compact carts for small garages
- Label storage areas
- Keep PPE easily accessible
- Store filler rods in dry containers (important in UK humidity)
- Upgrade to 3-tier carts for better organisation
🧰 Must-Have Items for Your Welding Cart
- Welding helmet
- Gloves
- Clamps
- Wire brush
- Filler rods
- Spare consumables
👉 Keep essentials within reach.
🛡️ Safety Tips
- Lock wheels when welding
- Keep flammable items away
- Secure gas cylinders
- Avoid clutter
👉 Safety and organisation go hand in hand.
❓ FAQs
What is the best way to organise a welding cart?
Assign shelves, manage cables, secure cylinder, and keep tools accessible.
How do I store welding cables?
Coil them neatly and use hooks or holders.
Should tools be on the top shelf?
No — keep top shelf for the welder only.
Is a 3 tier cart better for organisation?
Yes — it provides more storage and flexibility.
🏁 Final Thoughts
The best way to organise a welding cart is to create a system that is:
- Logical
- Safe
- Easy to use
👉 Focus on:
- Shelf organisation
- Cable management
- Tool storage
- Safety
With a well-organised welding cart, you’ll work faster, safer, and more efficiently every time.


Leave a Reply