Adjusting your welding helmet settings correctly is one of the most overlooked yet critical skills in welding. Even a high-end auto-darkening helmet can perform poorly if the settings are not properly configured.
Incorrect settings can lead to:
- Poor visibility of the weld pool
- Eye strain and fatigue
- Flickering or delayed darkening
- Increased risk of arc eye
On the other hand, properly adjusted settings will give you:
- Clear, stable vision
- Faster reaction to the arc
- Better weld accuracy
- Maximum eye protection
In this complete UK guide, we’ll cover everything you need to know, including:
- A deep breakdown of each helmet setting
- How to adjust them step by step
- Recommended settings for different welding processes
- Troubleshooting common issues
- Expert tips for UK welders
Contents
- ⚠️ Why Welding Helmet Settings Matter More Than You Think
- 🔍 Understanding All Welding Helmet Settings (In Depth)
- 🛠️ Step-by-Step Setup Guide (Beginner to Pro)
- ⚙️ Recommended Settings by Welding Type
- ⚠️ Troubleshooting Common Issues
- 🧠 Pro Tips for Welders
- ❌ Common Mistakes to Avoid
- 🛡️ Safety Guidelines
- ❓ FAQs
⚠️ Why Welding Helmet Settings Matter More Than You Think
Many welders assume their helmet will “just work” out of the box. In reality, factory settings are only a starting point, not an optimal configuration.
🔥 Poorly adjusted settings can cause:
- Lens too dark → you can’t see the weld pool
- Lens too light → dangerous UV exposure
- Sensitivity too low → helmet doesn’t react
- Sensitivity too high → flickering in bright environments
- Incorrect delay → eye discomfort after welding
👉 Proper setup transforms your helmet from basic protection into a precision welding tool.
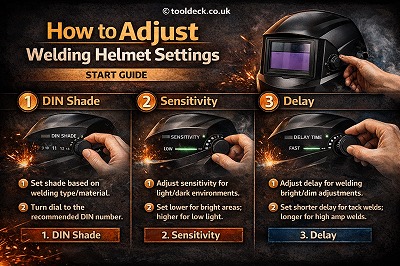
🔍 Understanding All Welding Helmet Settings (In Depth)
🔹 1. Shade Control (Darkness Level)
🎛️ What It Does
Shade determines how dark the lens becomes when the arc is active. It directly affects both visibility and safety.
🔢 Typical Shade Range:
- Light state: Shade 3–4
- Dark state: Shade 9–13 (some helmets go up to 14)
⚙️ How to Adjust Shade Properly:
- Start at shade 10 or 11
- Strike a test arc
- Observe weld pool visibility
- Adjust gradually:
- Increase if arc is too bright
- Decrease if weld pool is hard to see
📊 Recommended Shade Settings (UK Standard Guide)
| Process | Amperage | Recommended Shade |
|---|---|---|
| TIG | 10–100A | 9–11 |
| TIG | 100–200A | 11–12 |
| MIG | 100–200A | 10–12 |
| Stick | 100–300A | 11–13 |
⚠️ Key Rule:
- Too dark = poor weld quality
- Too light = eye damage risk
🔹 2. Sensitivity Control
🎛️ What It Does
Sensitivity controls how easily the helmet detects light from the welding arc.
⚙️ How It Works:
- High sensitivity → detects even weak arcs
- Low sensitivity → ignores minor light changes
🔧 How to Adjust:
- Start with medium setting
- Increase gradually until helmet reacts instantly
- Reduce if helmet flickers unnecessarily
💡 When to Use High Sensitivity:
- TIG welding (low amperage)
- Indoor welding
- Precision work
💡 When to Use Low Sensitivity:
- Outdoor welding (sunlight interference)
- High-amperage welding
- Environments with bright ambient light
👉 Sensitivity is often the main cause of flickering or failure.
🔹 3. Delay Control (Recovery Time)
🎛️ What It Does
Delay controls how long the lens stays dark after the arc stops.
⚙️ Adjustment Options:
- Short delay → quick return to light
- Long delay → stays dark longer
🔧 How to Adjust:
- Start with medium delay
- Increase if you experience eye discomfort
- Decrease for faster workflow
💡 Best Practice:
- High amperage welding → longer delay
- Low amperage welding → shorter delay
👉 Delay prevents sudden brightness from straining your eyes.
🔹 4. Grind Mode (Often Overlooked)
🎛️ What It Does
Disables auto-darkening so the helmet stays in light mode for grinding.
⚠️ Critical Warning:
Many welders forget to switch back to weld mode — leading to helmet not darkening at all.
✔ Always Check:
- Before welding, ensure helmet is NOT in grind mode
🔹 5. Advanced Settings (Premium Helmets)
Some higher-end helmets include:
🔹 Shade Range Adjustment
- Expand or limit shade levels
🔹 Sensitivity Fine-Tuning
- More precise control
🔹 Delay Micro-Adjustment
- Fine control for professional welding
👉 These features improve performance but require proper understanding.
🛠️ Step-by-Step Setup Guide (Beginner to Pro)
🔧 Step 1: Inspect Your Helmet
- Check battery condition
- Clean sensors
- Ensure lens is clear
🔧 Step 2: Set Helmet Mode
- Switch to WELD mode
- Disable GRIND mode
🔧 Step 3: Adjust Shade
- Start at 10–11
- Adjust after test weld
🔧 Step 4: Adjust Sensitivity
- Increase until arc is detected instantly
- Reduce if flickering occurs
🔧 Step 5: Adjust Delay
- Start medium
- Fine-tune for comfort
🔧 Step 6: Perform Test Weld
- Strike arc
- Observe:
- Reaction speed
- Visibility
- Comfort
👉 Never skip testing.
⚙️ Recommended Settings by Welding Type
🔹 TIG Welding (Precision Work)
- Shade: 9–12
- Sensitivity: High
- Delay: Medium
🔹 MIG Welding (General Use)
- Shade: 10–12
- Sensitivity: Medium
- Delay: Medium
🔹 Stick Welding (High Amperage)
- Shade: 11–13
- Sensitivity: Medium
- Delay: Medium to high
👉 Always adjust based on amperage and environment.
⚠️ Troubleshooting Common Issues
❌ Helmet Too Dark
- Lower shade setting
- Improve lighting
❌ Helmet Too Light
- Increase shade
- Increase sensitivity
❌ Flickering
- Increase sensitivity
- Replace battery
- Clean sensors
❌ Not Darkening
- Check grind mode
- Replace battery
- Inspect sensors
🧠 Pro Tips for Welders
- Adjust settings for each project
- Always test before welding
- Keep spare batteries
- Clean sensors regularly
- Store helmet in dry environment (important in UK climate)
❌ Common Mistakes to Avoid
❌ Using factory settings only
✔ Always customise
❌ Ignoring flickering
✔ Fix immediately
❌ Using wrong shade
✔ Follow amperage guide
❌ Forgetting grind mode
✔ Double-check before welding
🛡️ Safety Guidelines
Always choose helmets with:
- EN379 certification
- CE marking
👉 Ensures reliable protection in the UK.
❓ FAQs
What is the best shade for welding?
Typically 10–12 depending on process.
Why is my helmet flickering?
Sensitivity or battery issue.
Should I adjust settings every time?
Yes, depending on welding conditions.
Can wrong settings damage my eyes?
Yes — especially if shade is too low.
🏁 Final Thoughts
Learning how to adjust welding helmet settings is essential for:
- Better visibility
- Higher weld quality
- Maximum safety
👉 Focus on:
- Shade
- Sensitivity
- Delay
Mastering these settings will significantly improve your welding performance.
")


Leave a Reply