MIG welding can feel overwhelming at first, especially when you realise how many settings need to be dialled in correctly. One of the most important — and often misunderstood — is wire feed speed.
If you’re wondering how to set wire speed on a MIG welder properly, this guide will walk you through everything step by step, in a simple and practical way.
Contents
What Is Wire Feed Speed in MIG Welding?
Wire feed speed (WFS) refers to how fast the welding wire is fed through the torch into the weld joint. It is typically measured in IPM (inches per minute).
In MIG welding, there are three key settings that work together:
- Voltage
- Wire Feed Speed
- Gas Flow Rate
These settings control the heat input, arc stability, and metal transfer type.
👉 In simple terms:
- Voltage controls arc length
- Wire speed controls amperage (heat)
- Gas protects the weld from contamination
Why Wire Feed Speed Is So Important
Wire feed speed directly affects amperage, which determines how much heat is generated during welding.
- Higher wire speed = higher amperage = more heat
- Lower wire speed = lower amperage = less heat
When the wire feeds faster, it creates more electrical contact, increasing current flow and heat. This leads to:
- Deeper weld penetration
- Faster deposition rate
- Stronger weld (when set correctly)
However, too much speed can cause:
- Excess spatter
- Poor arc control
Too little speed can result in:
- Weak welds
- Lack of penetration
How Wire Speed Affects Weld Quality
Getting the wire speed right is essential for achieving a clean, strong weld.
Here’s what happens at different settings:
| Wire Speed | Result |
|---|---|
| Too High | Loud arc, excessive spatter, “pushing” effect |
| Too Low | Arc cuts out, wire burns back into tip |
| Correct | Smooth “buzzing” sound, stable arc |
💡 A properly set MIG welder should sound like steady frying bacon.
How to Set Wire Speed on a MIG Welder (Step-by-Step)
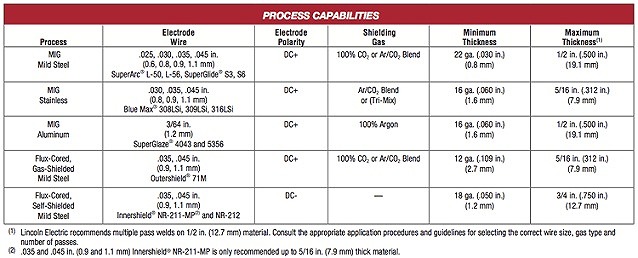
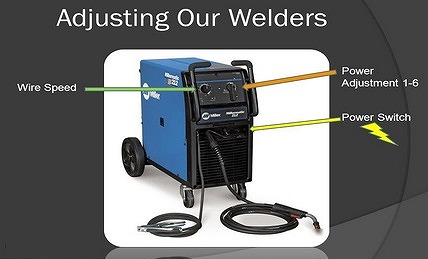
1. Start with Manufacturer Settings
Most welders (such as Lincoln or Miller machines) include a chart showing recommended settings based on:
- Material thickness
- Wire type and size
- Shielding gas
Use this as your starting point, not a final setting.
2. Match the Material Thickness
Thicker materials require:
- Higher wire speed
- More heat (amperage)
Thinner materials require:
- Lower wire speed
- Less heat to avoid burn-through
3. Test on Scrap Metal
Before welding your actual workpiece:
- Use scrap metal of similar thickness
- Weld in the same position (flat, vertical, overhead)
This allows you to safely fine-tune settings.
4. Adjust Based on Arc Behaviour
Watch and listen carefully:
- Too much spatter? → Reduce wire speed
- Wire stubbing into metal? → Reduce speed slightly
- Arc keeps breaking? → Increase wire speed
Make small adjustments until the arc becomes smooth and consistent.
5. Fine-Tune with Voltage
Wire speed and voltage must work together:
- If wire speed is too high for the voltage → unstable arc
- If voltage is too high → excessive heat and burn-through
Balance both settings for optimal results.
Can You Calculate Wire Feed Speed?
In some cases, you can estimate wire feed speed using a formula:
Wire Feed Speed = (Deposition Rate ÷ 5) × Wire Weight per Foot
However, in real-world welding, this is rarely necessary. Most welders rely on:
- Manufacturer charts
- Practical testing
- Experience
Pro Tips for Perfect MIG Wire Speed
- Always start with recommended settings
- Adjust in small increments
- Listen to the arc sound
- Practise on scrap metal first
- Keep your equipment clean and maintained
Final Thoughts
Setting the correct wire speed on a MIG welder takes a bit of practice, but once you understand how it affects heat and penetration, it becomes much easier.
Don’t worry if you don’t get it right straight away — even experienced welders rely on trial and error.
With consistent practice and careful adjustments, you’ll quickly develop the skill to dial in perfect settings every time.

")

")
Leave a Reply