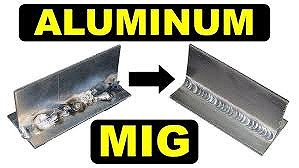
Welding aluminium with a MIG welder can feel intimidating at first. Unlike mild steel, aluminium is softer, conducts heat much faster, and requires more precise setup and technique. However, with the right equipment and approach, MIG welding aluminium becomes a practical and efficient method—especially for DIYers and light fabrication work across the UK.
In this complete beginner-friendly guide, you’ll learn exactly how to weld aluminium with MIG, including the correct setup, step-by-step technique, and expert tips to avoid common mistakes.
Contents
Why Aluminium is Difficult to Weld
Before jumping in, it’s important to understand why aluminium behaves differently:
- High heat conductivity → heats up quickly and dissipates heat fast
- Low melting point → easy to burn through
- Oxide layer → melts at a much higher temperature than aluminium itself
- Soft wire → can cause feeding issues in MIG welders
👉 These factors mean you must use the correct settings and technique to get good results.
What You Need to MIG Weld Aluminium
To weld aluminium successfully, your setup matters more than anything.
Essential Equipment:
- MIG welder (with aluminium capability)
- 100% Argon gas (not CO₂ mix)
- Aluminium wire (ER4043 or ER5356)
- Spool gun or Teflon liner (recommended)
- Clean welding torch and tips
💡 In the UK, most hobbyists use a spool gun to avoid wire feeding problems.
Best MIG Settings for Aluminium (Guide)
Here’s a reliable starting point:
- Wire size: 0.8mm or 1.0mm
- Voltage: Medium to high
- Wire speed: Higher than steel
- Gas: 100% Argon
- Gas flow rate: 12–15 litres per minute
👉 Always test your settings on scrap aluminium before starting.
Step-by-Step: How to Weld Aluminium with MIG
Step 1: Clean the Aluminium Thoroughly
Aluminium must be perfectly clean before welding.
- Remove oil and grease with acetone
- Use a stainless steel wire brush (dedicated for aluminium)
👉 This removes the oxide layer and improves weld quality.
Step 2: Set Up Your MIG Welder Properly
Make sure:
- You are using 100% Argon gas
- The wire feeds smoothly (spool gun recommended)
- Correct polarity is set (DCEP – Direct Current Electrode Positive)
Step 3: Use the Push Technique Only
When welding aluminium, always use the push technique:
- Push the torch at a 10–15° angle
- Improves gas coverage
- Produces cleaner welds
👉 Pulling will result in poor shielding and contamination.
Step 4: Maintain a Short Arc Length
Keep the distance between the tip and the workpiece short:
- Around 10–12mm stick-out
- Helps maintain arc stability
Step 5: Weld at a Steady Speed
Aluminium requires a faster travel speed than steel:
- Too slow → burn-through
- Too fast → lack of fusion
👉 Keep a steady, controlled motion.
Step 6: Avoid Stopping Mid-Weld
Try to maintain a smooth, continuous weld:
- Stopping can create weak points
- Restarting may cause defects
Pro Tips for MIG Welding Aluminium
✔ Use a Spool Gun
This prevents soft aluminium wire from tangling inside the cable.
✔ Preheat Thick Aluminium
For thicker sections:
- Preheat to around 100–150°C
- Helps improve penetration
✔ Keep Everything Clean
Aluminium is very sensitive to contamination:
- Clean before every weld
- Use dedicated tools
✔ Use the Right Wire Type
- ER4043 → easier to weld, smoother finish
- ER5356 → stronger welds, slightly harder to use
Common Mistakes to Avoid
❌ Birdnesting (Wire Tangling)
Cause: Soft wire feeding issues
Fix: Use a spool gun or Teflon liner
❌ Porosity (Bubbles in Weld)
Cause: Contamination or poor gas coverage
Fix: Clean metal and check gas flow
❌ Burn-Through
Cause: Too much heat
Fix: Increase speed and reduce voltage slightly
❌ Weak Welds
Cause: Moving too fast or low heat
Fix: Adjust balance between speed and power
Safety Tips
- Always wear a welding helmet and gloves
- Ensure proper ventilation
- Avoid inhaling fumes
- Keep your workspace clean and organised
Final Thoughts
Learning how to MIG weld aluminium takes more practice than welding steel, but it’s a highly valuable skill—especially for automotive, marine, and DIY projects in the UK.

")
")

Leave a Reply