A reliable auto-darkening welding helmet depends heavily on one simple component: the battery. When the battery starts to fail, your helmet may flicker, delay, or stop darkening completely — putting your eyes at serious risk.
The good news? Replacing a welding helmet battery is usually quick and easy.
In this complete UK guide, you’ll learn:
- How welding helmet batteries work
- Signs your battery needs replacing
- Step-by-step replacement instructions
- Tips for different helmet types
- When to replace the whole helmet
Contents
- ⚠️ Why Battery Health Matters
- 🔋 Types of Welding Helmet Batteries
- ⚠️ Signs Your Welding Helmet Battery Needs Replacing
- 🛠️ Tools You’ll Need
- 🔧 Step-by-Step Welding Helmet Battery Replacement
- ⚙️ Special Cases (Different Helmet Types)
- ⚖️ Battery Replacement vs New Helmet
- 🧠 Pro Tips for Welders
- ❌ Common Mistakes to Avoid
- 🛡️ Safety Tips
- ❓ FAQs
⚠️ Why Battery Health Matters
Your welding helmet battery powers:
- Arc sensors
- LCD auto-darkening filter
- Control electronics
🔥 If the battery is weak:
- Helmet may flicker
- Delayed darkening
- No darkening at all
👉 A failing battery = unsafe welding conditions.
🔋 Types of Welding Helmet Batteries
🔹 1. Replaceable Batteries
Most modern helmets use:
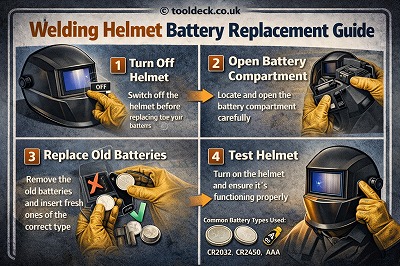
- CR2032 (most common)
- CR2450
- AAA (less common)
✅ Advantages:
- Easy to replace
- Low cost
- Reliable
🔹 2. Solar-Assisted Helmets
These use:
- Built-in rechargeable cells
- Solar panel support
⚠️ Important:
Solar helmets still rely on internal batteries — they are not fully solar-powered.
🔹 3. Non-Replaceable Batteries
Some budget helmets have sealed batteries.
❌ Disadvantage:
- Cannot be replaced
- Helmet must be replaced when battery dies
👉 Always check before buying.
⚠️ Signs Your Welding Helmet Battery Needs Replacing
🔍 Common Symptoms:
- Helmet flickering
- Not darkening properly
- Slow response to arc
- Inconsistent performance
- Works only in bright light
👉 These are clear warning signs of battery failure.
🛠️ Tools You’ll Need
- Replacement battery (correct type)
- Small screwdriver (if required)
- Clean cloth
- Optional: contact cleaner
👉 Simple tools — no special skills required.
🔧 Step-by-Step Welding Helmet Battery Replacement
🔹 Step 1: Turn Off the Helmet
- Ensure helmet is not active
- Work in a clean, dry area
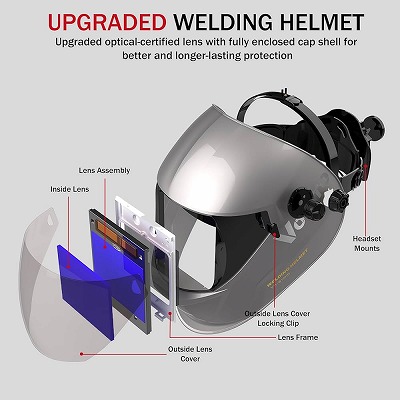
🔹 Step 2: Locate the Battery Compartment
Common Locations:
- Inside the helmet (behind lens)
- Side panel
- Behind removable cover
👉 Some models require removing the lens.
🔹 Step 3: Remove Old Battery
- Use screwdriver if needed
- Carefully remove battery
- Note battery orientation (+/-)
⚠️ Important:
Do not force or damage battery holder.
🔹 Step 4: Clean Battery Contacts
- Check for corrosion or dirt
- Clean with cloth or contact cleaner
👉 Good contact ensures stable power.
🔹 Step 5: Insert New Battery
- Use correct battery type
- Match polarity (+/- correctly)
- Fit securely
👉 Incorrect installation = helmet won’t work.
🔹 Step 6: Reassemble Helmet
- Replace cover or lens
- Tighten screws if needed
🔹 Step 7: Test the Helmet
How to Test:
- Use test button (if available)
- Or strike a small arc
- Check for instant darkening
👉 Always test before real welding.
⚙️ Special Cases (Different Helmet Types)
🔹 Solar Welding Helmets
- Place under bright light before use
- Replace backup battery if possible
🔹 Sealed Battery Helmets
- Cannot replace battery
- Replace entire helmet
👉 Not recommended for long-term use.
🔹 High-End Helmets
- May have dual batteries
- More complex access
👉 Follow manufacturer instructions.
⚖️ Battery Replacement vs New Helmet
🔧 Replace Battery If:
- Helmet works normally after replacement
- No damage to lens or sensors
🔁 Replace Helmet If:
- Battery is non-replaceable
- Helmet still fails after replacement
- Lens or electronics faulty
👉 Safety always comes first.
🧠 Pro Tips for Welders
- Replace batteries every 6–12 months
- Keep spare batteries in workshop
- Store helmet in dry conditions (UK humidity matters)
- Avoid leaving helmet in cold garages
- Test helmet before every use
❌ Common Mistakes to Avoid
❌ Using wrong battery type
✔ Always match specifications
❌ Installing battery incorrectly
✔ Check polarity
❌ Ignoring battery warning signs
✔ Replace early
❌ Using cheap low-quality batteries
✔ Use reliable brands
🛡️ Safety Tips
- Never weld with faulty helmet
- Always test after replacement
- Replace damaged components immediately
👉 Your eyesight depends on it.
❓ FAQs
How often should I replace welding helmet batteries?
Every 6–12 months depending on usage.
Can I use rechargeable batteries?
Only if compatible with your helmet.
Why is my helmet still not working after battery replacement?
Possible sensor or lens issue.
Are solar helmets battery-free?
No — they still require internal batteries.
🏁 Final Thoughts
Replacing your welding helmet battery is one of the simplest and most important maintenance tasks.
👉 Always remember:
- Use the correct battery
- Install properly
- Test before welding
A working battery ensures:
- Fast response
- Stable darkening
- Safe welding


")

Leave a Reply