MIG welding (Metal Inert Gas welding) is one of the easiest and most popular welding methods for beginners in the UK. Whether you’re working on DIY home projects, car repairs, or light fabrication, learning how to MIG weld properly can save you time and money.
In this step-by-step guide, you’ll learn exactly how to MIG weld—from setting up your machine to laying your first clean weld.
Contents
What is MIG Welding?
MIG welding uses a continuously fed wire electrode and shielding gas to create strong, clean welds. It’s beginner-friendly because:
- Easy to learn compared to TIG or Stick welding
- Produces clean welds with minimal slag
- Works well on thin to medium metals
Essential Equipment for MIG Welding
Before you start, make sure you have the following:
- MIG welder
- Welding wire (usually mild steel wire)
- Shielding gas (Argon/CO₂ mix is common in the UK)
- Welding helmet (auto-darkening recommended)
- Gloves and protective clothing
- Clamps and work surface
MIG Welding Setup (Beginner Basics)
1. Install the Wire Spool
Open your MIG welder and install the wire spool correctly. Ensure the wire feeds smoothly through the drive roller and liner.
2. Connect the Shielding Gas
Attach your gas bottle and regulator. Set the flow rate to around 10–15 litres per minute, which is typical for UK conditions.
3. Set Voltage and Wire Speed
Most welders have a chart inside the machine. Match settings based on:
- Metal thickness
- Wire size
💡 Tip: Start with recommended settings and adjust slightly during practice.
Step-by-Step: How to MIG Weld
Step 1: Prepare the Metal
Clean the metal thoroughly:
- Remove rust, paint, oil, or dirt
- Use a wire brush or grinder
👉 Clean metal = stronger welds
Step 2: Clamp Your Workpiece
Secure your materials using clamps. This prevents movement and ensures a steady weld.
Step 3: Check Your Ground Connection
Attach the ground clamp directly to clean metal. Poor grounding causes unstable arcs.
Step 4: Hold the Torch Correctly
- Hold the torch at a 10–15° angle
- Keep a steady hand
- Maintain a consistent distance (about 6–10mm from the surface)
Step 5: Start Welding
Pull the trigger and begin moving the torch steadily along the joint.
There are two main techniques:
- Push technique (recommended for beginners):
Push the torch forward → cleaner weld, less penetration - Pull technique:
Drag the torch backward → deeper penetration
Step 6: Control Your Speed
- Too fast → weak, thin weld
- Too slow → excess buildup
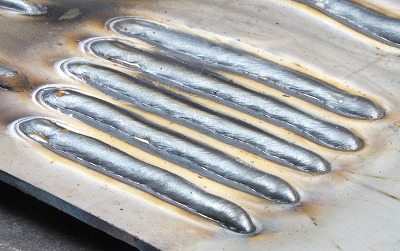
👉 Aim for a consistent bead that looks like a row of stacked coins
Step 7: Inspect Your Weld
After welding:
- Check for smooth, even beads
- Look for minimal spatter
- Ensure proper penetration
Common Beginner Mistakes (and How to Fix Them)
❌ Too Much Spatter
- Cause: Incorrect voltage or dirty metal
- Fix: Clean surface and adjust settings
❌ Burn-Through
- Cause: Too much heat on thin metal
- Fix: Lower voltage or move faster
❌ Weak Welds
- Cause: Moving too fast or low heat
- Fix: Slow down and increase power slightly
Safety Tips for MIG Welding
- Always wear a proper welding helmet
- Work in a well-ventilated area
- Keep flammable materials away
- Use gloves and long sleeves to prevent burns
Final Thoughts
Learning how to MIG weld as a beginner doesn’t have to be difficult. With the right setup, steady technique, and a bit of practice, you can quickly produce strong, clean welds.
Start with simple joints, practise regularly, and fine-tune your settings. Over time, your welds will improve significantly.


")
Leave a Reply