If you’ve ever worked with a MIG welder, you’ll know how frustrating it can be when the welding wire keeps sticking. Not only does this interrupt your workflow, but it can also ruin weld quality and damage your equipment if left unresolved.
In this guide, we’ll break down the common causes of MIG welder wire sticking and provide practical, easy-to-follow fixes to get your welding process running smoothly again.
Contents
What Does MIG Welder Wire Sticking Mean?
Wire sticking (often called “burnback”) occurs when the welding wire melts faster than it feeds, causing it to fuse back into the contact tip. This results in:
- Interrupted arc
- Poor weld bead quality
- Frequent downtime
- Potential damage to your MIG torch
Understanding why this happens is the first step to fixing it.
Main Causes of MIG Welder Wire Sticking
1. Incorrect Wire Feed Speed
One of the most common causes is a mismatch between wire feed speed and voltage.
- If the wire feed is too slow → the wire burns back into the tip
- If it’s too fast → the arc becomes unstable
👉 Fix:
Adjust the wire feed speed to match your voltage settings. Most modern MIG welders include a chart to guide you based on material thickness.
2. Voltage Set Too High
Excessive voltage increases heat, causing the wire to melt too quickly before it exits the tip.
👉 Fix:
- Lower the voltage slightly
- Test weld and fine-tune gradually
3. Worn or Damaged Contact Tip
A worn contact tip can restrict smooth wire feeding, leading to sticking.
Signs of a faulty tip:
- Irregular arc
- Burn marks
- Enlarged or uneven hole
👉 Fix:
Replace the contact tip regularly. It’s a low-cost component but critical for performance.
4. Poor Wire Quality or Rusty Wire
Low-quality or contaminated wire can cause inconsistent feeding.
👉 Fix:
- Use high-quality welding wire
- Store wire in a dry environment
- Replace rusty or dirty spools immediately
5. Drive Roll Tension Issues
Improper tension in the drive rolls can either:
- Slip (too loose)
- Crush the wire (too tight)
Both situations can lead to wire sticking.
👉 Fix:
Adjust tension so the wire feeds smoothly without slipping or deformation.
6. Blocked or Worn Liner
The liner guides the wire from the spool to the torch. Dirt, debris, or wear can cause resistance.
👉 Fix:
- Clean or replace the liner
- Blow compressed air through it regularly
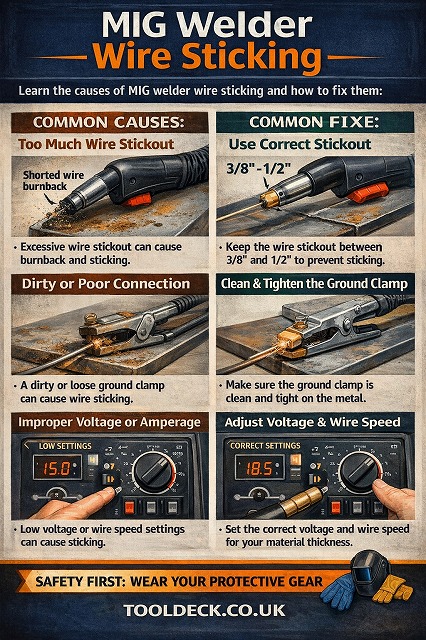
7. Incorrect Tip-to-Work Distance
Holding the torch too close or too far affects arc stability.
👉 Fix:
Maintain a consistent stick-out (usually 10–15 mm for MIG welding).
8. Poor Ground Connection
A weak ground clamp reduces arc stability, contributing to burnback.
👉 Fix:
- Ensure a clean metal-to-metal connection
- Secure the ground clamp properly
How to Prevent MIG Wire Sticking (Pro Tips)
To avoid future issues, follow these best practices:
- ✔ Keep your equipment clean and well-maintained
- ✔ Use the correct settings for material thickness
- ✔ Replace consumables (tips, liners) regularly
- ✔ Store wire properly to prevent contamination
- ✔ Perform routine checks before welding
Quick Troubleshooting Checklist
If your MIG wire keeps sticking, run through this checklist:
- Is the wire feed speed correct?
- Is the voltage too high?
- Is the contact tip worn out?
- Is the wire clean and rust-free?
- Are drive rolls properly adjusted?
- Is the liner clean and unobstructed?
- Is your ground connection secure?
FAQs
Why does my MIG wire keep burning back to the tip?
This usually happens due to low wire feed speed or high voltage, causing the wire to melt faster than it feeds.
How often should I replace the contact tip?
It depends on usage, but for frequent welders, replacing it every few weeks ensures optimal performance.
Can cheap welding wire cause sticking?
Yes. Poor-quality wire can lead to inconsistent feeding and increased friction, causing sticking issues.
What is the ideal stick-out for MIG welding?
Typically between 10–15 mm, depending on the application.
Conclusion
MIG welder wire sticking is a common but easily fixable problem. By understanding the root causes—whether it’s incorrect settings, worn components, or poor wire quality—you can quickly restore smooth operation and improve your weld quality.
Regular maintenance and proper setup are key to preventing this issue altogether. With the tips in this guide, you’ll spend less time troubleshooting and more time producing clean, professional welds.


")
Leave a Reply