A sliding mitre saw is one of the most versatile cutting tools for DIYers and professionals in the UK. Unlike standard mitre saws, it allows you to cut wider materials with greater precision, making it ideal for flooring, framing, and joinery work.
In this complete guide, you’ll learn how to use a sliding mitre saw safely and accurately, plus expert tips to get the best results.
Contents
- What Is a Sliding Mitre Saw?
- What Can You Cut with a Sliding Mitre Saw?
- Tools & Safety Gear
- Step-by-Step: How to Use a Sliding Mitre Saw
- Why Sliding Technique Matters
- Types of Cuts You Can Make
- Common Mistakes to Avoid
- Pro Tips for UK Users
- Sliding Mitre Saw vs Standard Mitre Saw
- UK-Specific Tips
- ❓ FAQs: Using a Sliding Mitre Saw
What Is a Sliding Mitre Saw?
A sliding mitre saw features rails that allow the blade to move forward and backward, increasing cutting capacity.
👉 Compared to standard mitre saws:
- Cuts wider boards
- More versatile
- Slightly more complex to use
What Can You Cut with a Sliding Mitre Saw?
- Wide timber boards
- Skirting boards
- Laminate flooring
- Decking
- Framing materials
👉 Perfect for both DIY and professional UK projects.
Tools & Safety Gear
Before starting:
- Sliding mitre saw
- Measuring tape
- Pencil
- Clamps
- Safety goggles
- Hearing protection
- Dust mask
Step-by-Step: How to Use a Sliding Mitre Saw
Step 1: Set Up the Saw Properly
- Place the saw on a stable surface
- Ensure rails move smoothly
- Check blade condition
- Connect dust extraction (if available)
Step 2: Measure and Mark Your Material
- Measure carefully
- Mark the cut line clearly
💡 Tip: Always mark the waste side.
Step 3: Position the Material
- Place the material flat against the fence
- Align the blade with your mark
- Clamp the material if needed
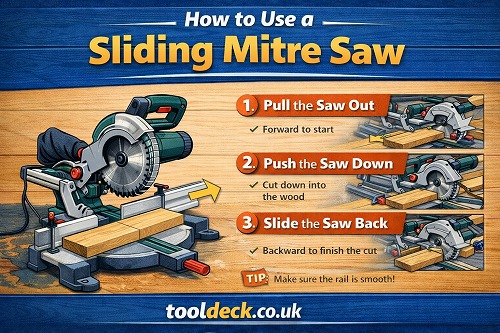
Step 4: Pull the Blade Forward
👉 Key difference from standard saws:
- Pull the blade toward you before starting the cut
Step 5: Start the Saw
- Turn on the saw
- Let it reach full speed
Step 6: Perform the Sliding Cut
- Lower the blade into the material
- Push the blade backwards (away from you) through the cut
👉 This motion ensures smooth and controlled cutting.
Step 7: Finish Safely
- Keep the blade down until it stops spinning
- Raise it slowly
- Remove the material
Why Sliding Technique Matters
Incorrect technique can cause:
- Rough cuts
- Kickback
- Reduced accuracy
👉 Always: Pull → Start → Push
Types of Cuts You Can Make
90° Straight Cuts
- Set mitre to 0°
45° Mitre Cuts
- Rotate the base to 45°
Bevel Cuts
- Tilt the blade for angled cuts
Compound Cuts
- Combine mitre + bevel
Common Mistakes to Avoid
❌ Cutting Without Sliding Properly
Leads to uneven cuts.
❌ Pushing Too Fast
Causes tear-out and rough edges.
❌ Not Securing Material
Movement = inaccurate cuts.
❌ Dirty Rails
Affects smooth operation.
Pro Tips for UK Users
✔ Keep Rails Clean
Dust buildup affects sliding performance.
✔ Use a Fine-Tooth Blade
Better for MDF and laminate.
✔ Let the Blade Do the Work
Avoid forcing the cut.
✔ Practice First
Especially if you’re new to sliding saws.
Sliding Mitre Saw vs Standard Mitre Saw
| Feature | Sliding Mitre Saw | Standard Mitre Saw |
|---|---|---|
| Cutting capacity | Wide materials | Limited width |
| Portability | Lower | Higher |
| Versatility | High | Medium |
UK-Specific Tips
- Ideal for cutting laminate flooring in UK homes
- Great for wide skirting boards
- Use dust extraction to reduce indoor mess
❓ FAQs: Using a Sliding Mitre Saw
What is the correct way to use a sliding mitre saw?
The correct method is to pull the blade forward, start the saw, lower it into the material, then push it back through the cut.
Why do you pull the saw forward first?
Pulling the saw forward ensures a smooth entry into the material and prevents binding or rough cuts.
Can beginners use a sliding mitre saw?
Yes, but it requires practice. Start with simple 90° cuts before moving to angled or compound cuts.
What is the advantage of a sliding mitre saw?
It allows you to cut wider materials compared to a standard mitre saw, making it more versatile.
Is a sliding mitre saw better than a standard one?
It depends on your needs. Sliding saws are better for larger materials, while standard saws are more portable.
Why is my sliding mitre saw not cutting straight?
This could be due to dirty rails, improper technique, or the saw needing calibration.
Final Thoughts
Learning how to use a sliding mitre saw opens up a wide range of cutting possibilities. With the correct technique and setup, you can achieve precise, clean cuts on larger materials with ease.
👉 Key takeaway:
- Use the correct sliding motion
- Keep your setup stable
- Focus on control and accuracy


Leave a Reply