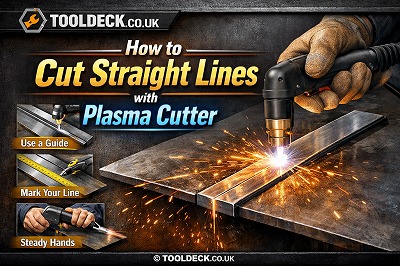
Cutting straight lines with a plasma cutter can be tricky if you rely on freehand alone. The key is using the right technique, proper setup, and simple guiding tools to achieve clean, accurate cuts every time.
This guide shows you exactly how to cut straight lines with a plasma cutter like a pro.
Contents
- ⚠️ What You Need for Straight Plasma Cuts
- Step-by-Step: How to Cut Straight Lines with Plasma Cutter
- 🔹 Step 1: Mark the Cutting Line Accurately
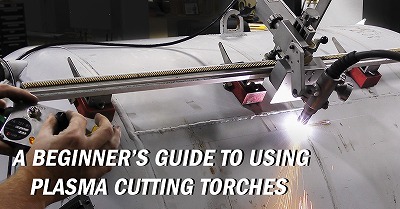
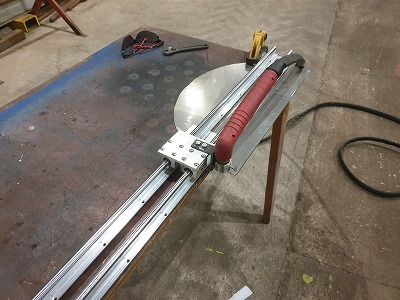
- 🔹 Step 2: Set Up a Straight Edge or Guide Properly
- 🔹 Step 3: Secure the Material Firmly
- 🔹 Step 4: Set Correct Machine Parameters
- 🔹 Step 5: Position the Torch Correctly
- 🔹 Step 6: Start the Cut Cleanly
- 🔹 Step 7: Move Along the Guide Smoothly & Consistently
- 🔹 Step 8: Control Cutting Speed Precisely
- 🔹 Step 9: Maintain Constant Torch Height
- 🔹 Step 10: Finish the Cut Without Interruptions
- 🔹 Step 11: Inspect & Fine-Tune the Result
- 🎯 Why It Matters:
- Expert Workflow Summary
- Best Tools for Perfectly Straight Cuts
- 🧠 Pro Tips for Straight Plasma Cutting
- ❌ Common Mistakes to Avoid
- ❓ FAQs
⚠️ What You Need for Straight Plasma Cuts

Essential tools:
- Plasma cutter
- Straight edge (metal ruler or bar)
- Clamps or magnetic guides
- Marker or chalk
Optional (for best results):
- Guide rail system
- Plasma cutting table
👉 Straight cuts are 80% setup and 20% technique.
Dưới đây là phiên bản mở rộng chuyên sâu, chi tiết và tối ưu SEO hơn cho phần:
Step-by-Step: How to Cut Straight Lines with Plasma Cutter
🔹 Step 1: Mark the Cutting Line Accurately
✅ What to Do:
- Use:
- Steel ruler
- Chalk / paint marker
- Scriber (for precision work)
- Draw a clear, straight, highly visible line
🎯 Why It Matters:
- Provides a visual reference
- Reduces cutting deviation
- Improves overall accuracy
👉 Pro Tip: Mark slightly wider lines for better visibility in bright sparks.
🔹 Step 2: Set Up a Straight Edge or Guide Properly
✅ Guide Options:
- Metal straight edge (flat bar)
- Clamped steel ruler
- Magnetic guide
- Professional guide rail
⚠️ Important Adjustment:
- Offset guide from cut line to account for:
- Torch nozzle width
- Kerf (cut width)
🎯 Why It Matters:
- Eliminates hand wobble
- Ensures perfectly straight path
👉 Pro Tip: Test offset on scrap metal before final cut.
🔹 Step 3: Secure the Material Firmly
✅ What to Do:
- Clamp workpiece securely
- Ensure no movement or vibration
- Use stable cutting surface
🎯 Why It Matters:
- Prevents shifting during cutting
- Maintains straight line accuracy
👉 Pro Tip: Even slight movement can ruin a straight cut.
🔹 Step 4: Set Correct Machine Parameters
✅ Key Settings:
- Amperage → based on thickness
- Air pressure → 60–90 PSI (under load)
🎯 Why It Matters:
- Stable arc improves control
- Incorrect settings cause drift or rough cuts
👉 Pro Tip: Stable arc = easier to follow a straight line.
🔹 Step 5: Position the Torch Correctly
✅ Technique:
- Hold torch at 90° (perpendicular)
- Maintain 2–4 mm standoff distance
- Keep wrist steady and locked
🎯 Why It Matters:
- Prevents bevelled edges
- Maintains consistent cut width
👉 Pro Tip: Rest your hand lightly on the guide for stability.
🔹 Step 6: Start the Cut Cleanly
✅ How to Start:
- Start from the edge if possible
- If piercing:
- Begin at slight angle (10–15°)
- Then straighten torch
🎯 Why It Matters:
- Prevents blowback
- Ensures smooth start
👉 Pro Tip: Edge starts produce cleaner, straighter lines.
🔹 Step 7: Move Along the Guide Smoothly & Consistently
✅ What to Do:
- Keep torch tip aligned with guide
- Move at constant speed
- Avoid jerky movements
🎯 Why It Matters:
- Maintains straight cutting path
- Prevents waviness
👉 Pro Tip: Let the guide control direction—not your hand.
🔹 Step 8: Control Cutting Speed Precisely
✅ What to Watch:
- Sparks should:
- Exit straight down or slightly backwards
🔍 Adjust Speed:
- Sparks trailing backwards → too fast
- Sparks scattering → too slow
🎯 Why It Matters:
- Speed affects:
- Cut straightness
- Edge quality
👉 Pro Tip: Consistent speed is more important than fast speed.
🔹 Step 9: Maintain Constant Torch Height
✅ What to Do:
- Keep distance consistent (2–4 mm)
- Avoid lifting or dipping torch
🎯 Why It Matters:
- Ensures stable arc
- Prevents uneven kerf
👉 Pro Tip: Use drag shield for perfect consistency.
🔹 Step 10: Finish the Cut Without Interruptions
✅ What to Do:
- Continue movement until cut is complete
- Do not stop mid-line
🎯 Why It Matters:
- Prevents:
- Rough edges
- Line deviation
- Slag buildup
👉 Pro Tip: If stopping is unavoidable, restart slightly before the stop point.
🔹 Step 11: Inspect & Fine-Tune the Result
✅ Check:
- Straightness of cut
- Edge smoothness
- Slag level
✅ Clean if Needed:
- Wire brush (light slag)
- Grinder (heavy slag)
🎯 Why It Matters:
- Ensures professional finish
👉 Pro Tip: A perfect straight cut needs minimal cleanup.
Expert Workflow Summary
For consistently straight plasma cuts:
- Mark accurately
- Use a guide with correct offset
- Secure material
- Set proper parameters
- Maintain angle, height, and speed
- Follow through smoothly
Best Tools for Perfectly Straight Cuts
Recommended tools:
- Straight edge + clamps
- Magnetic guides
- Guide rail systems
- CNC plasma table (advanced)
👉 Tools make straight cutting much easier.
🧠 Pro Tips for Straight Plasma Cutting
- Always use a guide for precision
- Keep steady hand movement
- Maintain consistent settings
- Replace consumables regularly
- Practice on scrap metal
❌ Common Mistakes to Avoid
❌ Freehand cutting
✔ Use guides
❌ Incorrect torch angle
✔ Keep 90°
❌ Inconsistent speed
✔ Maintain steady pace
❓ FAQs
Can I cut straight without a guide?
Yes, but accuracy is lower.
What is the best tool for straight cuts?
A straight edge or guide rail.
Why are my cuts wavy?
Usually poor control or no guide.
Does speed affect straightness?
Yes — very important.
🏁 Final Thoughts
Learning how to cut straight lines with a plasma cutter comes down to using guides, maintaining control, and setting up correctly. With practice and the right tools, you can achieve clean, precise, and perfectly straight cuts every time.


Leave a Reply